Tuesday, 10 December 2013
Sunday, 8 December 2013


Sunday, 1 December 2013
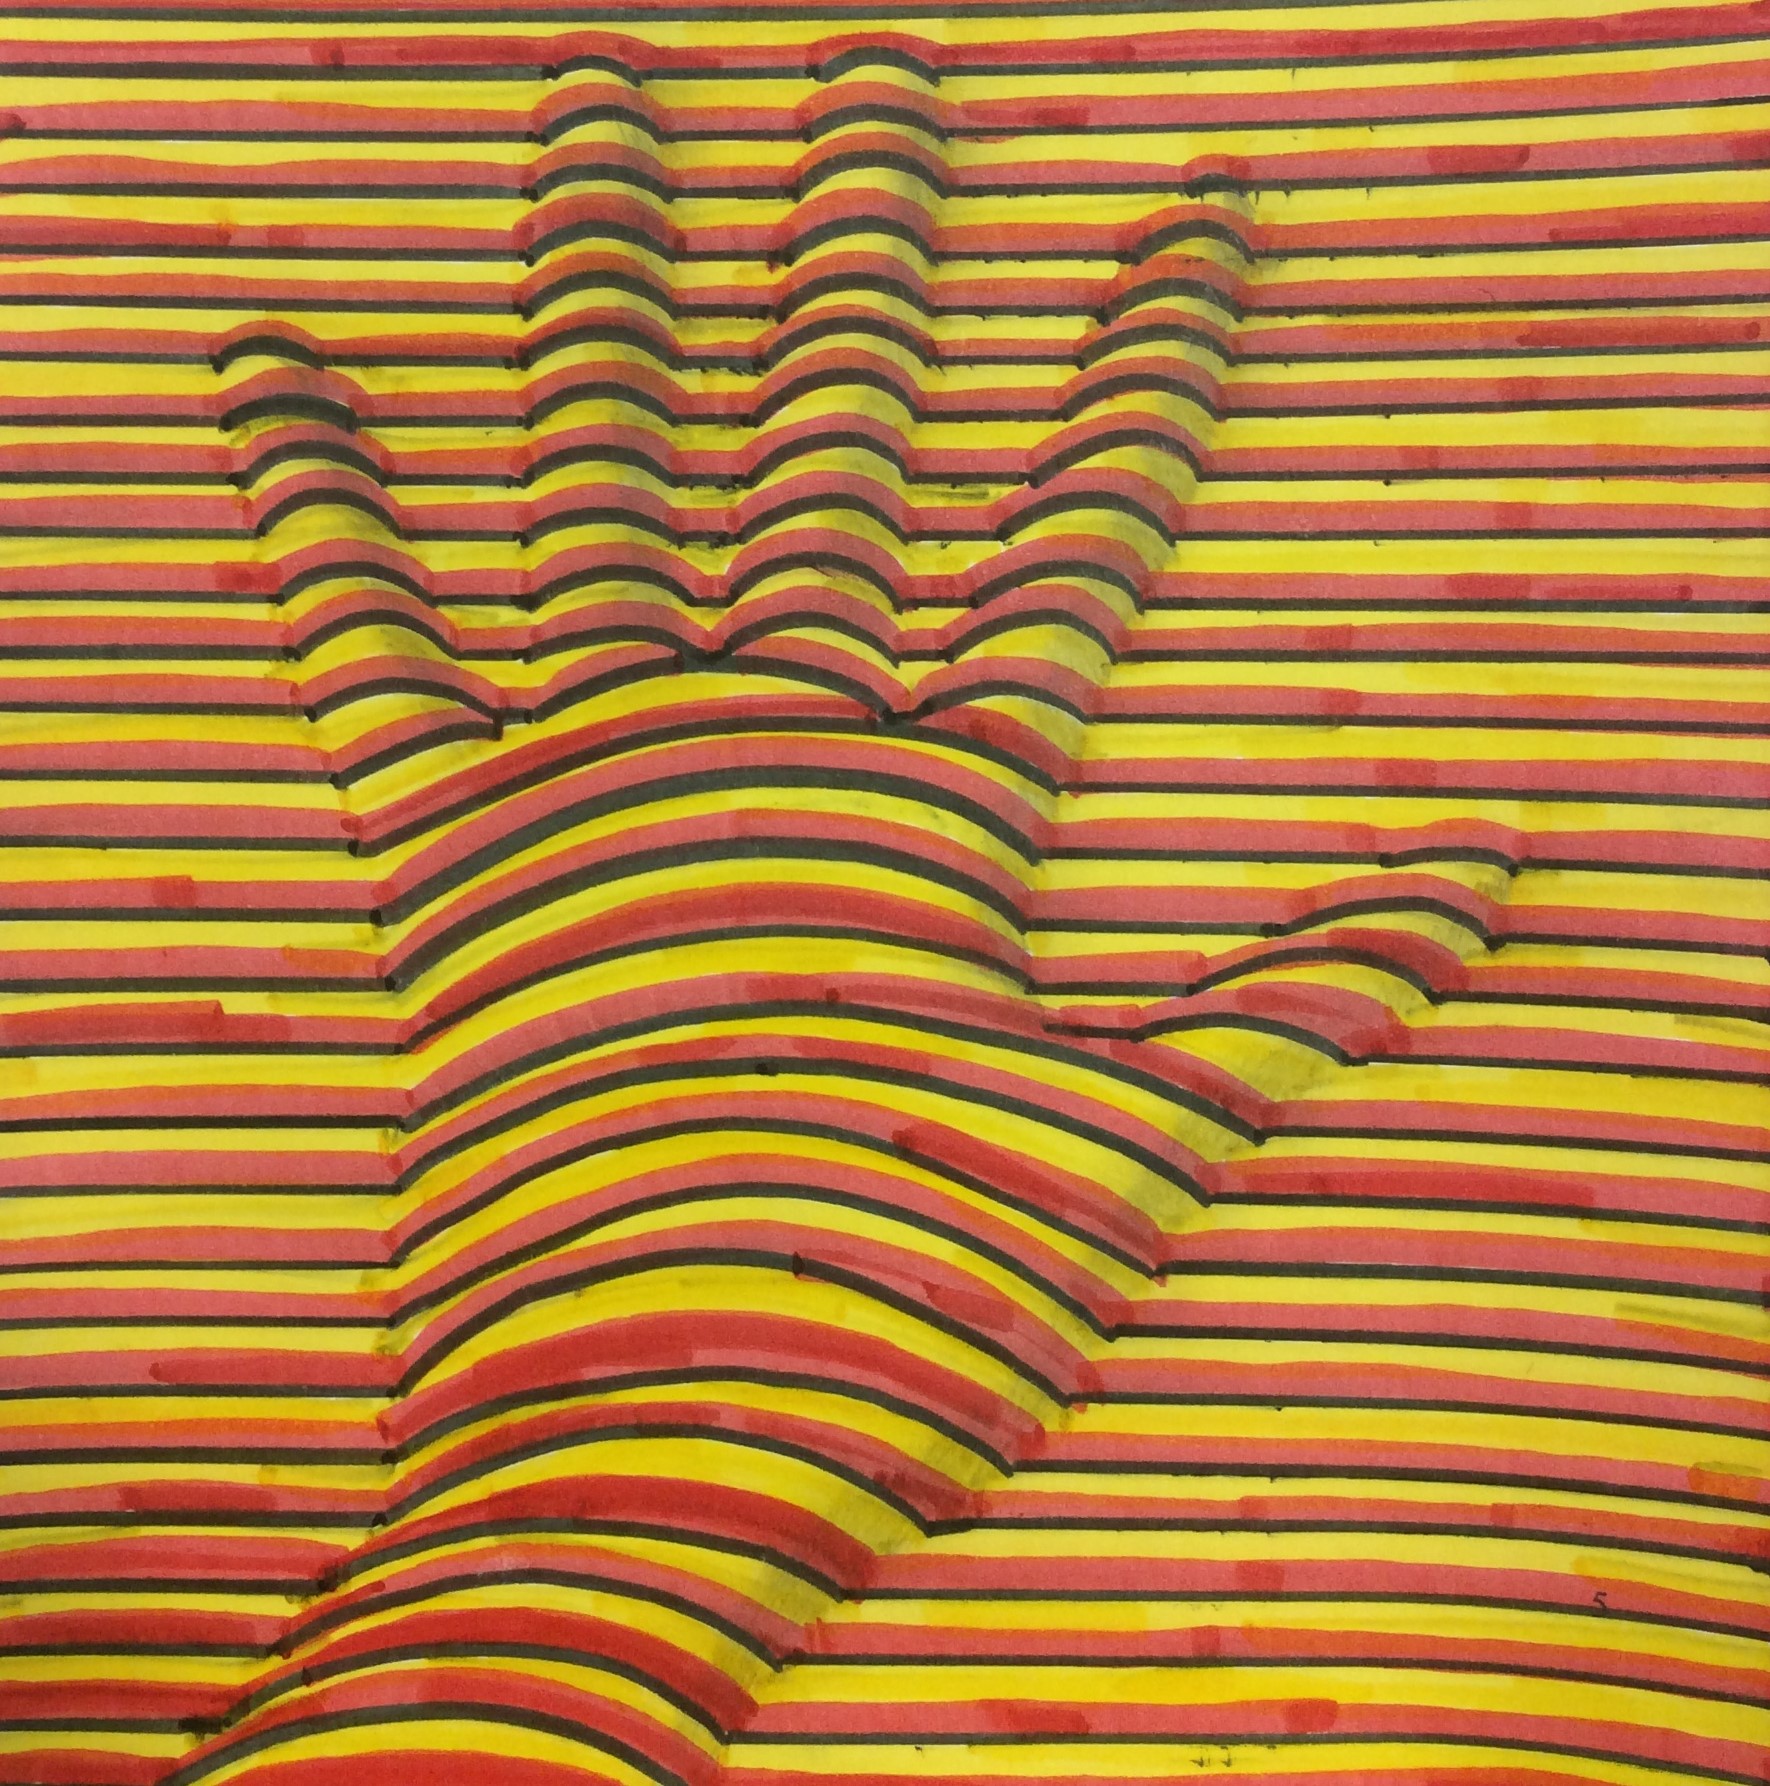
Draw a 3D hand just with lines.
 |
| Pablo |
If you want to have a great 3D drawing of your hand just follow the instructions:
- On a white paper trace with a pencil the silhouette of your hand.
- Choose 3 or 4 nice colours to work with. One of them has to be a dark colour.
- Draw straight lines till you get to the hand and then make a curve line till the end of the it, then keep on going with a straight line. Pretend you are drawing on top of your real hand!

Isn't it cool!!!
 |
| Ting |
Thursday, 28 November 2013

Wednesday, 27 November 2013
Tuesday, 26 November 2013
Space.
Space is one of the seven Elements of Art.

Space is the area around, above, and within an object. But the feeling of space in a painting or drawing is always an illusion. Painters have been creating the illusion of space for a very long time. Leonardo Da Vinci recorded these devices to show the illusion of space during the Italian Renaissance.
There are six easy ways to make our three-dimensional drawings and give the illusion of depth and space (by Miriam Paternoster, Arte a scuola)

1. Overlapping. Occurs when a figure partially hides an object that's behind it. Our brain beli
eves that one is closer and the other further.
2. Shading. Light and shadow create the illusion of form and space.
3. Placement on the paper. Elements placed on the top of the picture are appear to be in the distance.
4. Size. The smaller objects will appear to be further away from the viewer.
5. Value and focus.
- Lighter values and less detail suggest distance.
- Perception of detail and clarity decrease as things go back into space.
- Objects that are further away are cooler in color temperature, while objects that are closer are warmer. Color seems to become less intense as it gets further away.
Monday, 25 November 2013
Art Lab.
If you want to practice the art of restoration here you will find a cool game to prove your skills.

GO FOR IT!!!
Tuesday, 12 November 2013
Kaleidoscope.
Create your own Kaleidoscope using this application:

What is a Kaleidoscope?
It is a cylinder with mirrors containing loose, colored objects such pebbles and bits of glass. As the viewer looks into one end, light entering the other creates a colorful pattern, due to the reflection off of the mirrors. (Wikipedia)

Wednesday, 28 August 2013
Working with ... Silhouettes.
Draw 16 different silhouettes inside the grid. Remember, do not draw numbers, letters or symbols.
I've found in internet a photographer that has worked with silhouettes but the other way around we have done. Have a look...

 |
| Carmen O. |
 |
| Pau G. |

Silhouette.
A silhouette is the image of a person, an object or scene
represented as a solid shape of a single colour, usually black, its
edges matching the outline of the subject (Wikipedia).

In the days of long ago, before photography was invented, our great-grandfathers and great-grandmothers used to have portraits of themselves taken sideways. They were what were known as silhouette portraits, and they were not taken with a camera, but were cut out of thin black paper, and stuck upon a white card.
 Where are silhouettes used?

In the days of long ago, before photography was invented, our great-grandfathers and great-grandmothers used to have portraits of themselves taken sideways. They were what were known as silhouette portraits, and they were not taken with a camera, but were cut out of thin black paper, and stuck upon a white card.

- Signs and Graphic design
- Shadow theatre
- Photography and Cinema, etc.
Working with ... Organic and Geometric Shapes
For this exercise each student has to choose an Organic and a Geometric Shape. They have to be easy shapes to recognize, because we are going to work with the silhouettes.
Example of Shapes:
Example of Shapes:
- Organic: fish, tree, flower, apple, person, etc
- Geometric: key, knife, car, candel, scissors, etc.
- Draw the silhouettes on a card.
- Cut the shapes out.
- Get a new white paper.
- Use the shapes as a stencil and draw several times the organic shape all over a the paper. It can be half shape on the sides.
- Now, do the same with the geometric shape. The interesting part of the composition is to draw one shape over the other.
- Re-trace with black ink ( 0'4), and erase the pencil once it is dry.
- Colour each piece in a different colour. For the background use a new colour (grey, black,...).
The result will be a colourful composition. Check the examples of other students:

 |
| Stencil shapes |
 |
| Irene R. |
Monday, 12 August 2013
Colour in Motion.
This fun and attractive application runs us through the colors, their
possible combinations, its connotations and symbolism in the everyday
life, and thus allows students to reflect and do with critical spirit
which implies the use of one or another colour in our environment. It is also presented in a very attractive way.
Maybe the vocabulary it is complicated for a 7th grade student (1r d'ESO), but the application is quite interesting. Check it out!!!
Maybe the vocabulary it is complicated for a 7th grade student (1r d'ESO), but the application is quite interesting. Check it out!!!
by Claudia Cortes
Sunday, 11 August 2013
Colours Game
Well, you have learnt and practised the Colour Theory, now it's time for a little test....
GOOD LUCK!!
Wednesday, 17 July 2013
Colour colour.
Another of the Tate Kids games is called

You can choose from a variety of paintings and colour them the way you want.
It is really easy!!!
 |
| Original. The Cholmondeley ladies. |
 |
| Painted with the Colour Colour game |
Tuesday, 16 July 2013


Monday, 15 July 2013
Sunday, 14 July 2013
Working with ... Radial symmetry
Students have to finish the satined glass following the radial symmetry.

And then, colour the composition once finished drawing and inking it (0'8).
 |
| Aike Riera |

 |
| Ting |
 |
| Damià V. |
Saturday, 13 July 2013
Working with ... Symbols.
Each student will get a copy with symbols on it, and has to design a face with any of them.


- The symbol size and the direction can be changed.
- The symbol itself has to remain the same, for example two brakets can not be closed to become a square.
- They have to draw at least 4 sketches before doing the final work.
- Is going to be a black and white edrawing.
Examples of my students' work

 |
| Paula T. |
 |
| Marc R. |
 |
| Alicia M. |
Sketches


Friday, 12 July 2013
Working with ... Signage
Design two signs:
Brainstorming: Students can think of things they like to do and are not allowed to, or things they hate to do and they have to do. All the ideas will be drawn on the back of the paper and the best ones will be the final design, this time in colour.
Sketches


- one a prohibition (triangle/circle and red),
- the other a permission (square/rectangle and blue)
Brainstorming: Students can think of things they like to do and are not allowed to, or things they hate to do and they have to do. All the ideas will be drawn on the back of the paper and the best ones will be the final design, this time in colour.
Examples of my students' work.
 |
| Alicia M. |
 |
| Joan Miquel A. |
Sketches

Wednesday, 10 July 2013
Imaginary animal.
Each student has to create an imaginary animal. It is important that this animal has not been designed before.The drawing has to be completed by the following ittems:
It's a dangerous animal, because it can handle the time and his eye attack could be mortal. It lives in deserted cementeries and eats spirits.
Aurius is peacefull and only eats mushrooms. IHe lives in a strange planet.
- Name of their creation
- Character (agressive, kind, funny, shy, etc)
- What does it eat (stones, clouds, humans, etc.)
- Where does it live ( inside the earth, in your pocket, etc.)
Examples of my students creations
 |
| Guillem A. |
It's a dangerous animal, because it can handle the time and his eye attack could be mortal. It lives in deserted cementeries and eats spirits.
 |
| Joan P. |
Aurius is peacefull and only eats mushrooms. IHe lives in a strange planet.
 |
| Pau G. |
Tuesday, 4 June 2013
Monday, 3 June 2013
How to Draw ... Feet
Following Shoo Rainer advises we are going to be able to learn how to draw feet.
Check the video
Sunday, 2 June 2013
Collage Mural.
We have participated on the contest "Ni un Foc al Bosc" organized by Xarxa Forestal (Servei de Gestió Forestal i Protecció del Sòl), and the group 1-ABC has won one of the prices. Congratulations!!!!!!
Each class has created a Composition and each student becomes a piece of
it. The student has totally liberty to use the colours/textures
(collage) he/she wants. Afterwards, we put all the pieces together and
decorate the class with it.


 | |
| Group 1-ABC. |
 |
| Group 1-DE |


Monday, 27 May 2013
How to Draw ... a Comic Character.
Former Disney animator and director, Francis Glebas, shot a short video
demonstrating how to draw one of his character designs, Iggy.
 Check the video:
Sunday, 31 March 2013
Papier mâché/Paper Mache
An easy way to create 3D objets are with the technique called Papier mâché.
On the following video you will learn how to make a fish: Nemo
Material:
- Balloon
- Newspaper
- Cardboard
- Wallpaper glue o you can make your own glue.
- Paper masking tape
- White paint and any other colour you will need in case you do another animal.
- Sandpaper
- Paint brushes
- Choose a form for support (ballon, etc) on which to glue the paper strips.
- Make strips of paper (newspaper, tisue, etc) and glue them together with adhesive on top of the support.
- Cut the cardboard into the shapes you need and fix them with paper masking tape to the balloon.
- Cover your project with no more than 4 layers of paper mache!
- Once the paper is dry, sand it, paint it and decorate it.
Monday, 4 March 2013
Drawing textures.
On Youtube we find several chanels made by Shoo Rayner.
On Shoobeedoodling Chanel he shows us how to draw and decorate with textures and patterns.
On Shoobeedoodling Chanel he shows us how to draw and decorate with textures and patterns.
Monday, 7 January 2013

Subscribe to:
Posts (Atom)